Reading a
nautical chart means interpreting an electronic or paper chart in order to
identify a boat's position, a safe route, and underwater hazards. A nautical
chart contains symbols for depths, channels, sea marks, and obstructions, and
understanding them is essential for safe navigation. In the Finnish
archipelago, where shoals and narrow channels are common, correctly
interpreting nautical charts is a vital skill for every boater.
Modern navigation
increasingly relies on electronic Navionics charts and chartplotters, but the
basic principles are the same whether you're using a paper coastal chart, a
lake chart series, or a digital chart card. This guide covers all the key
elements of a nautical chart and teaches you to interpret them in practical
situations.
Basic types of nautical charts
in Finland
Several
different types of nautical charts are used in Finnish waters for different
purposes. Chart choice
depends on the navigation area, boat size, and the nature of the trip.
In electronic
charts, such as Navionics Finland charts, all these layers are combined in a
single chart package. The chartplotter automatically switches to a more
detailed view as you zoom in closer or as speed drops, for example when
approaching a harbor.
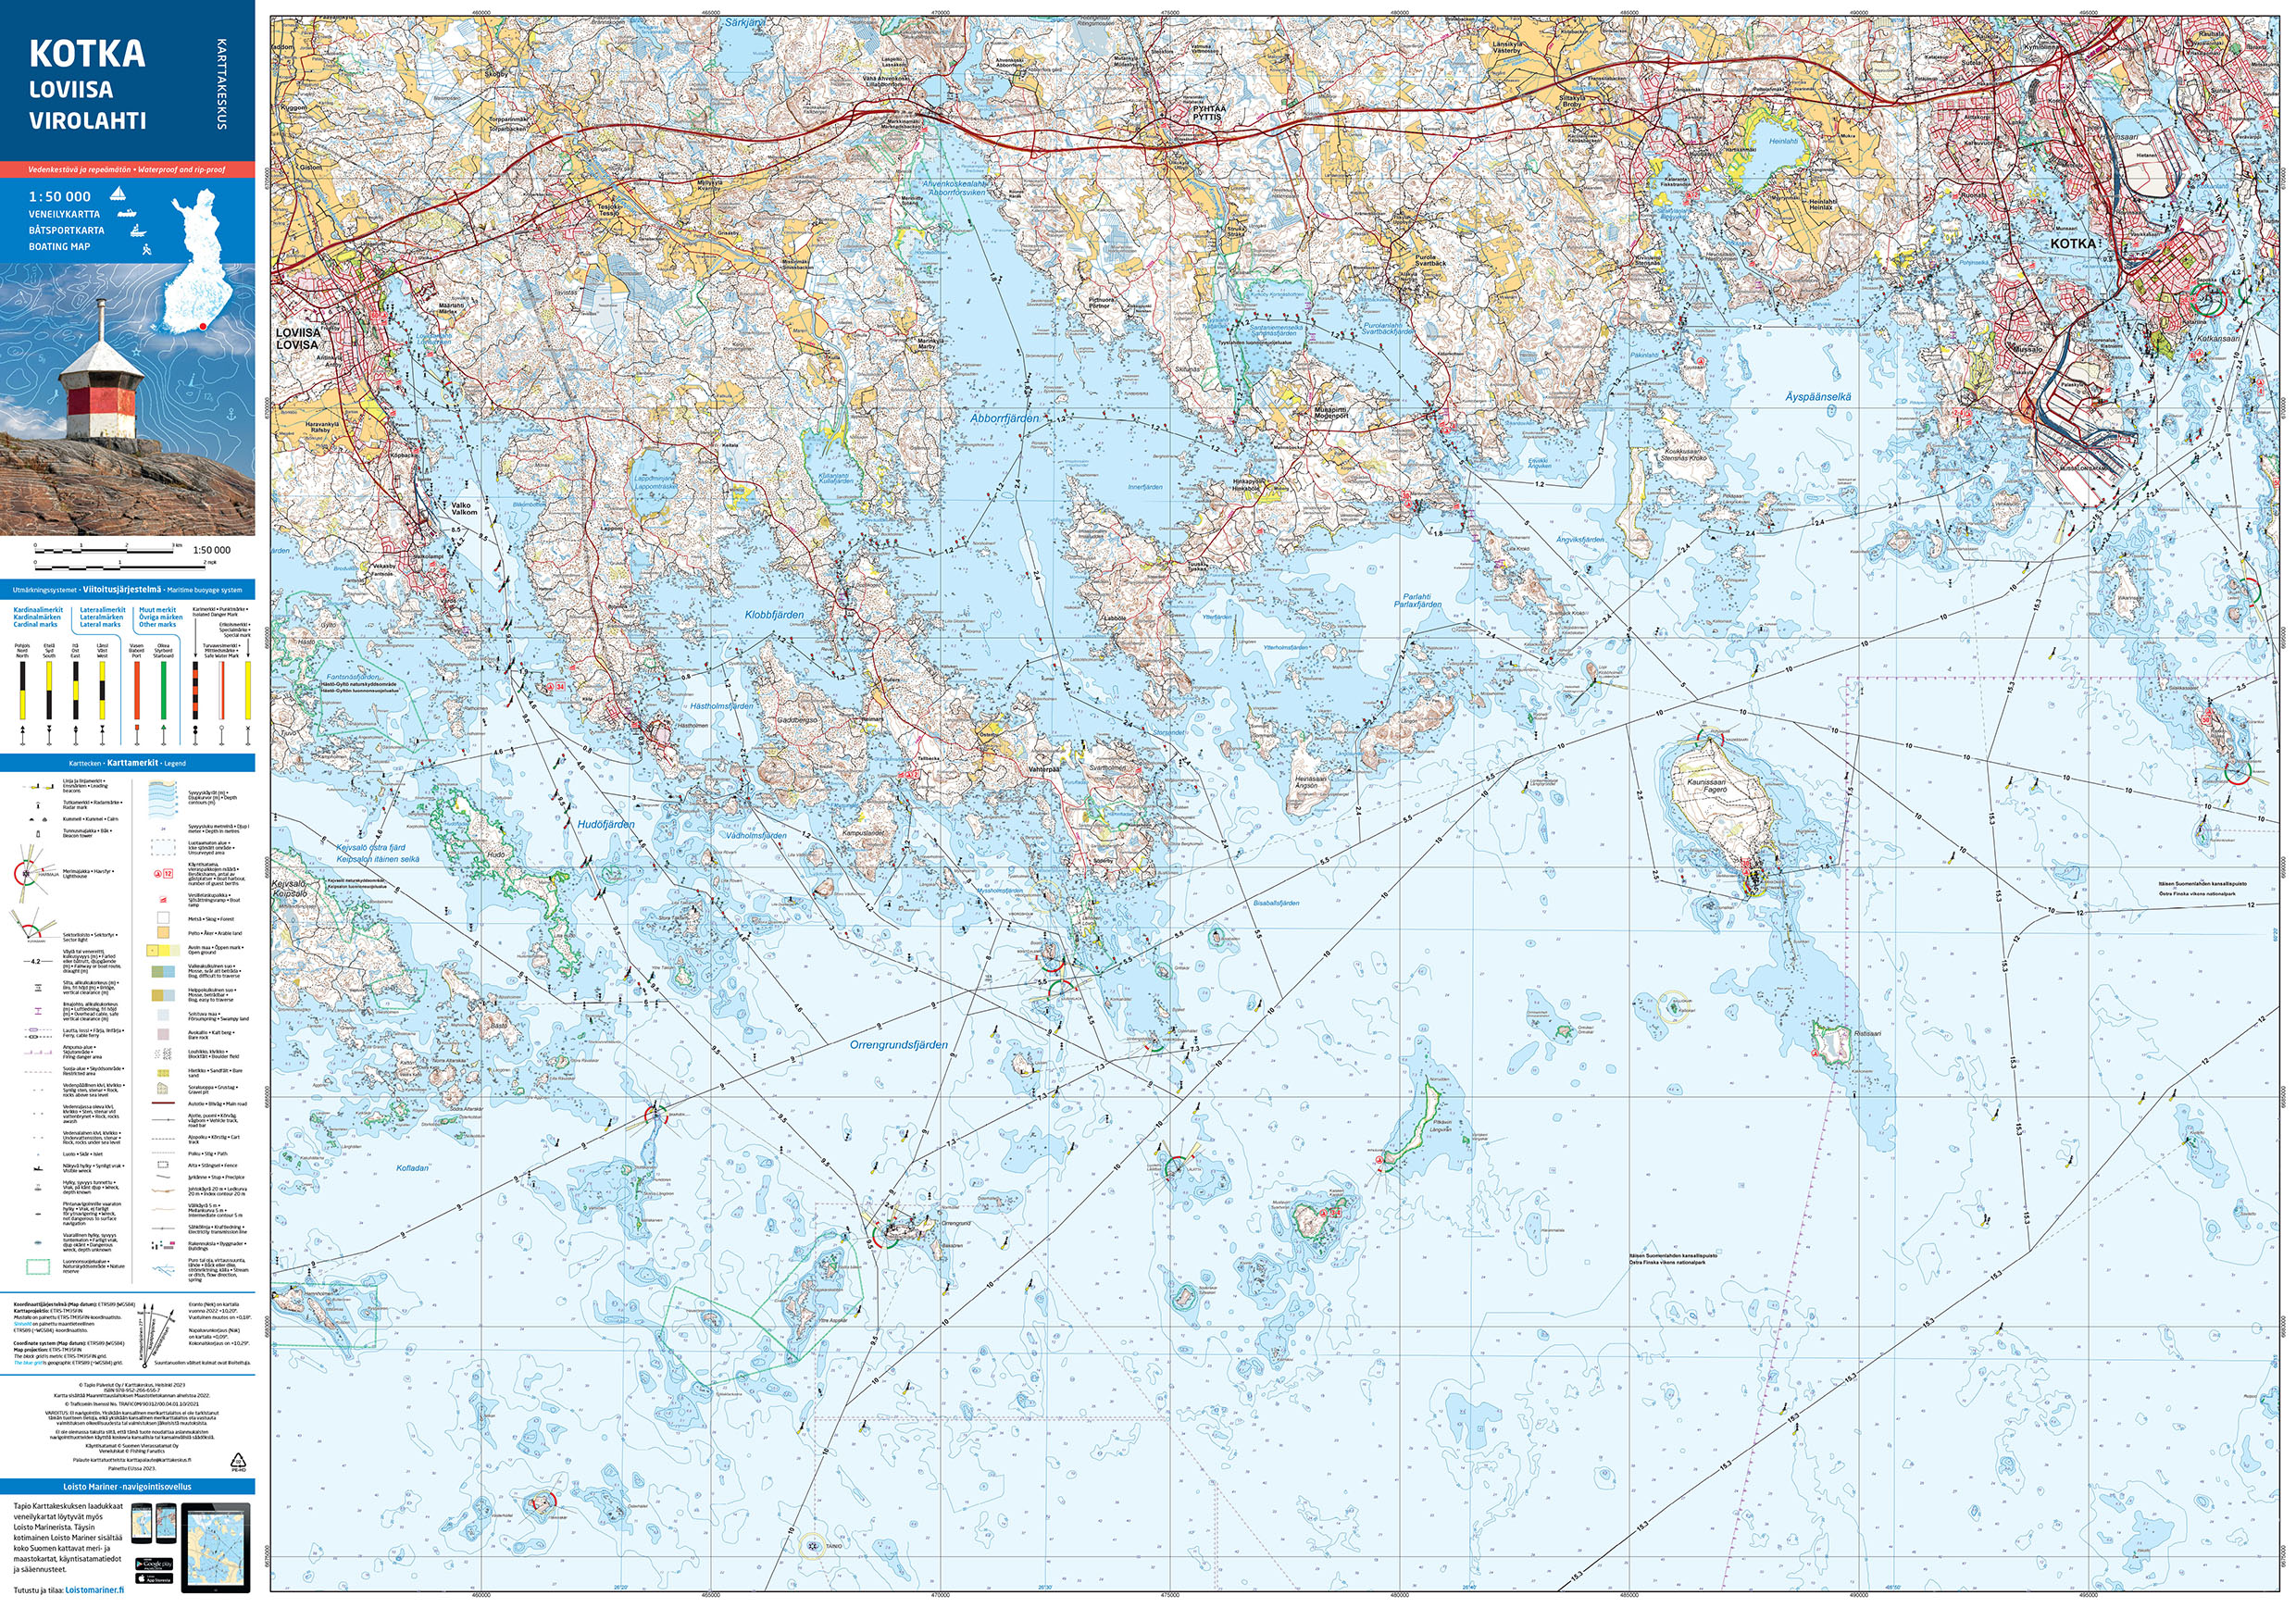
Nautical chart symbols and color codes – the basics
A nautical
chart's colors and symbols follow the international IALA system (International
Association of Marine Aids to Navigation and Lighthouse Authorities), so the
basic principles are the same worldwide. Finland uses the IALA Region A system,
in which, for example, a red lateral mark is located on the LEFT (port) side of
the channel when entering.
Color codes on a nautical chart
Changes depending on what chart - Blue: Water deep enough for navigation. The
darker the blue, the deeper the water. Lighter blue areas indicate shallower
water.
Changes depending on what chart - White/light blue area: Shallow water
(typically less than 2–5 meters deep). These areas require caution and a
shallow-draft passage.
Green or yellow: Dry land or an area at the
waterline (e.g., an islet or a point of land).
Red or magenta: A
hazard area, a navigation exclusion zone, or a lit buoy. Magenta highlights
features critical to navigation.
Purple (magenta)
circles and sectors: The light field of a lighthouse or navigation light. The
purple sector shows the direction from which the lighthouse is visible and what
color the light is.
Understanding the
color codes is the first step toward safe navigation. The first time you look
at a chart, the blue and white areas immediately tell you where you can safely
travel and where you should keep your distance.
The most common sea mark
explanations on a chart
Sea marks are
physical structures – buoys, beacons, and lighthouses – that guide boaters
along a safe route. On a chart they appear as symbols, and each symbol
indicates the mark's type, color, and any light.
When you're out
in the Finnish archipelago during the boating season, you'll most often
encounter red and green lateral marks that form a "border" along
channels. The rule of thumb (IALA A) is: red on the left, green on the right,
when you're coming into harbor or further into inland waters. When you head
back out to open sea, the colors swap: green moves to the right and red to the
left.
Interpreting sea
marks is like reading traffic signs on a road – once you understand the basic
logic, navigation becomes intuitive. A red and a green lateral mark form the
edges of a safe channel, and when you see a safe-water mark, you know you're in
the middle of a safe area.
Depth contours and identifying
shoals
Depth contours
(isobaths) are one of a nautical chart's most important elements. They connect
points of equal depth and form lines that depict the seabed's topography. The
closer together the depth contours are, the steeper the seabed.
Interpreting depth figures
The depth figures
shown on a chart are given in meters from mean water level (MW). Finland uses a
theoretical mean water level line (MW) to which all depths are referenced. In
practice, this means actual depth can vary by 20–50 cm depending on wind direction,
air pressure, and season.
Bolded depth
figures: These are safe depths in that area. For example, 5.0 means five
meters.
5 m, 10 m, 20 m
depth contours: On most coastal charts, the most important depth contours are
highlighted with a bolder line. The 5-meter contour is often critical for shallow-draft boats.
Shoal markings:
If the chart shows, for example, 1.2 or 0.5, that's a shallow spot that could
be dangerous. These are often additionally marked in yellow or green.
Practical
example: If your boat's draft is 1.5 meters, you need to avoid any area where
the depth is less than 2.0–2.5 meters. This gives an adequate safety margin
above the bottom, especially in waves or on an uneven seabed.
Calculating safety margins
Under Keel
Clearance (UKC) is an important basic navigation concept. It means the minimum
distance between the boat's bottom and the seabed. A common rule of thumb is:
In normal
conditions: 0.5–1.0 meters of clearance on top of draft.
In waves or
strong wind: 1.0–1.5 meters of clearance, since the boat can hit bottom in a
wave trough.
In an unfamiliar
area: Favor at least 2 meters of clearance until you're sure of the route.
If your boat's
draft is 1.5 meters and you want 1.0 meters of clearance, you need to stay in
at least 2.5 meters of water (1.5 m + 1.0 m = 2.5 m). Near shoals, it's always
wise to slow down and watch the fishfinder if you have one.
Channels and how they're marked
on a chart
Channels are safe
routes whose edges are marked with sea marks. On a chart, channels often appear
as magenta dashed lines connecting turns and guiding the boater along a safe
route.
Understanding channel marks
In Finland,
channels are marked according to the IALA A system:
Red lateral mark
on the left: When you arrive at a harbor or travel further into inland waters,
keep the red mark on your left.
Green lateral
mark on the right: Correspondingly, the green mark stays on your right as you
travel inward.
Channel width: On
a chart, channel width is often marked, for example 50 m or 100 m. In narrow
channels you must stay precisely within the marked area.
In practice,
navigating a channel means following the magenta line on the chart and keeping
the boat between these markers. Modern chartplotters show the boat's position
in real time, so you'll immediately see if you drift too close to the channel's
edge.
Channel names and designations
Every channel has
a name and possibly a number. For example, "Helsinki Channel No. 1"
or "Turku Archipelago Channel." These names make route planning and
communicating with other boaters over VHF radio easier.
Lighthouses, sector lights, and
navigation lights
Lighthouses and
lights are important aids, especially at night and in poor visibility. On a
chart they're marked with symbols that indicate the light's color, flash
pattern, and range.
Interpreting lighthouse symbols
A typical
lighthouse on a chart looks like this:
Symbol: A black
or magenta circle with purple sectors radiating from it.
Light color: For
example, Fl(3)R 10s means a red (R = Red) flashing light that flashes three
times (3) every 10 seconds.
Light field: The
purple sector shows the direction from which the lighthouse is visible. If
you're inside the sector, you'll see the light; if you're outside it, you
won't.
Practical
example: If you see a white flashing light that flashes twice in a row
(Fl(2)W), you can check the chart to identify which lighthouse it is and where
you are along the channel. This
is especially useful for night navigation or in fog.
Sector lights and leading
(range) lights
A sector light
shows a different color depending on the angle from which you view it. A typical sector light might show:
Green light: You're on the left side of the
channel (a safe area).
White light: You're in the middle of the
channel (the ideal route).
Red light: You're on the right side of the
channel (a hazard area or shallow water).
Leading lights help keep the boat on the
correct line in narrow channels. When two lights are aligned, you're on the
correct course. If the lower light appears to the left, steer right; if it
appears to the right, steer left.
Interpreting harbor charts and anchorages
Harbor charts are highly detailed charts
showing a harbor's structures, dock locations, anchorages, and services. A
harbor chart often includes the following information:
Dock depths: The depth is marked at each dock
area, for example 3.5 m.
Anchorages:
Marked with symbols, often ⚓ or "Anchor."
Services: The
chart may include symbols for fuel (⛽), a water point (????), or the harbor office.
Service areas:
Areas where you can haul the boat out of the water or do maintenance work.
When you arrive
at a new harbor, the harbor chart lets you plan which dock to tie up at and
where the nearest services are. Harbor guides complement charts with text-based
information on services, opening hours, and contact details.
Special features and marks on
lake charts
Lake charts
differ from coastal charts in a few ways:
Depth readings:
On lakes, depths are often shallower and vary more. Shoals can appear in
unexpected places.
Log booms and
obstructions: A lake chart may show markings for log booms, fishing nets, or
other obstructions that aren't permanent.
Island names: On
a lake chart, island names are important since they help you locate yourself
when GPS signal can be less accurate in forested areas.
Shoreline
elevation: Lake charts may include information about shoreline height above sea
level, which helps assess whether an area is suitable for anchoring.
In lake
navigation, it's important to know the specific features of the area. Lake
Saimaa and Lake Päijänne, for example, have numerous islands and narrow straits
where channels aren't always marked as clearly as along the coast.
The advantages and use of
electronic charts
Electronic chart
cards, such as Navionics, C-MAP, and Garmin charts, are the most popular way to
navigate today. They offer several advantages over traditional paper charts:
Automatic
updates: Charts are updated regularly, giving you the latest channel changes
and depth data.
Zoom and detail:
You can zoom in on the chart to see more detailed information about harbors and
channels.
GPS integration:
A chartplotter shows the boat's position in real time, its track, and an
estimated time of arrival.
AIS integration:
Many chartplotters can show the position and course of other vessels on the
chart.
Alarms and
warnings: The device can warn you if you drift too close to a shoal or stray
from your planned route.
Electronic charts
often also include extra features, such as weather forecasts, tide data, and
community-sourced information about harbors and anchorages. In the Navionics
Boating app, for example, users can share tips and reviews of harbors, which
helps other boaters find the best spots.
Practical tips for reading
nautical charts
Learning to read
nautical charts takes time, but these tips will help you get started:
Start in familiar
territory: Practice first on your home channel or in waters you know well, so
you understand how the chart matches reality.
Compare the chart
to your surroundings: When you spot a sea mark in the water, check it against
the chart. This helps you learn how symbols correspond to physical structures.
Use the
chartplotter view and a paper chart side by side: An electronic chart is fast,
but a paper chart gives a better overall picture of the area.
Mark your route
in advance: Plan your route calmly at home and mark important turns and hazard
points. This saves time and reduces stress on the water.
Learn to
recognize critical depths: If your boat's draft is 1.5 meters, practice quickly
identifying the 2–3 meter depth contours on the chart.
Use color to your
advantage: Blue = safe, white/light blue = shallow, magenta = an important
navigation feature.
The best way to
learn to read nautical charts is hands-on practice. Take a chart excerpt with
you on the boat and compare it with your surroundings in real time. Every
outing is a lesson, and soon you'll find yourself reading the chart
intuitively.
Summary: the golden rules of
reading a nautical chart
Safe navigation
is built on correctly interpreting the nautical chart. Once you understand the
color codes, sea marks, depth contours, and channel markings, navigation
becomes easier and more enjoyable. Here are the key rules to remember:
Blue water = safe
depth, white/light blue = shallow water.
Red on the left, green on the right when
entering.
Depth figures are in meters from mean water
level – always calculate your safety margin.
Lighthouses and lights help with night
navigation – learn to recognize flash patterns.
Use electronic
charts, but also keep a paper backup chart on board.
Once you've
mastered the basics of nautical charts, you're ready for safe, independent
navigation in the Finnish archipelago and inland waters. Remember to update your charts regularly and
follow notices to mariners and bulletins about channel changes. Have a good and
safe boating season!
Sources and further reading
Traficom – Nautical charts and navigation
IALA – International Association of Marine
Aids to Navigation
Navionics – Electronic nautical charts
|
Chart type |
Scale |
Purpose |
Typical information |
|
General charts |
1:50,000 – 1:500,000 |
Route planning, overview of a sea area |
Main channels, harbors, lighthouses, general
depths |
|
Coastal charts |
1:20,000 – 1:50,000 |
Coastal navigation, archipelago traffic |
Detailed depths, channels, sea marks, rocks |
|
Harbor charts |
1:5,000 – 1:15,000 |
Arriving at harbor, anchoring |
Dock locations, anchorages, harbor services |
|
Lake charts |
1:40,000 – 1:100,000 |
Inland water navigation |
Water area
boundaries, depths, islands, log booms |
|
Symbol |
Mark |
Color and shape |
Position in the channel |
|
Green triangle, point up |
Starboard-hand mark |
Green cone/buoy |
Right edge of the channel when entering |
|
Red square/cylinder |
Port-hand mark |
Red can-buoy |
Left edge of the channel when entering |
|
Red and green horizontal stripes |
Safe water mark |
Red-green horizontal stripes, sphere on top |
In the middle of safe water |
|
Yellow X mark |
Isolated danger mark |
Black-red, two spheres |
At an isolated
shoal/rock |
|
Yellow triangle, point up |
North cardinal mark |
Black-yellow, two cones pointing up |
North of the danger |
|
Purple, light field |
Lighthouse or sector light |
Structure or tower |
Visible from
afar, guides to the channel |
Disclaimer
This guide provides general guidance only and does not replace the product manufacturer's operating, installation, or service instructions. Marinekauppa is not responsible for actions taken based on this guide or their consequences. Always check product-specific instructions and consult a qualified professional if needed.